CPRNM® is a comprehensive directory designed to connect individuals and employers with top-tier training
providers including the AHA®, Red Cross®, and other training providers.*
 August 21, 2019
 Proper use of CPR and first aid can each give life-saving results. With the advanced guide to CPR and first aid, a broader knowledge is offered to help prepare for a critical situation.
CPR Overview & History
CPR or cardiopulmonary resuscitation is a medical technique to compress the patient’s chest with a goal of circulating the blood to vital organs including the brain and restore breathing to a victim of sudden cardiac arrest. Sudden cardiac arrest is the sudden stop of the heart beating. The heart beats to circulate life-giving oxygenated blood to vital organs. As such, sudden cardiac arrest is when this blood ceases to be circulated to critical organs throughout the body, mainly the brain.
CPR boils down to two simple and easy to remember steps. Step one, call 911. Step two, begin compressions: push hard and fast in the center of the chest. It really can be that simple, but in life and death situations, it also can be more complicated. Luckily, complicated does not have to mean difficult.
With its modern development in the 1960’s to a unified sequence of compressions and rescue breaths, CPR has become a widely taught life-saving measure. Advancements in specifications for younger/smaller patients and tools for medical professionals have evolved over the years. Evolution to even a hands-only practice have come to light. What remains the same is the goal to keep instructions for the general population (or non-medically trained) simple and easy to remember. With familiarity comes comfort, and with comfort comes the willingness to take action. The decision to respond when faced with a critical situation requiring CPR is often the first hurdle to overcome.
Bystander CPR
The bystander effect can be a major hindrance to initiation of CPR on a victim. The vast majority of sudden cardiac arrests (SCA) occur outside a medical setting. This means SCA happens most often in homes, public places, etc. With surroundings such as these it is up to a willing bystander to take initiative to assess the situation, identify SCA and begin CPR. The success rate of getting as far as CPR in such a situation, is about 30%. Less than a third of SCA victims even have a bystander willing or able to attempt CPR. Not very good odds out the gate.
What has very good odds is the likelihood that conducting CPR will help save an individual. Prompt CPR following the onset of SCA will double or even triple the rate of survival. Prompt is key. Without oxygen provided to the brain via blood circulation, brain death will occur within 4-10 minutes.
Recognizing the Need For CPR
Now that CPR is regarded as an essential life-saving procedure, it’s good to have awareness of how to recognize the need for it. A patient suddenly clutching their chest and falling over is the most common imagery, but not the only way SCA strikes.
The sudden clutching of the chest and falling down is depicted as having no warning signs others can foresee. Some other sudden and dramatic signs of SCA are: sudden collapse, not breathing, unconsciousness. On the other hand, there can be some warning signs even before SCA sets in. These signs to watch for include: weakness, shortness of breath, chest pain, palpitations, dizziness, rapid heartbeat, wheezing. If the patient or someone close to them can identify these warning signs, it is best to get to a doctor.
In circumstances that escalate quickly before a visit to a doctor or emergency room can take place, it is best to call 911. There is no gestation period for warning signs to full onset of SCA, and every case is different. Time is of the essence, recall brain damage only takes a few minutes, so calling medical help to the patient is crucial.
Some common situations or groups of people where sudden cardiac arrest occurs most often are: those with heart disease or a history of cardiac arrest, men over 45 years of age, women over 55 years of age, drowning victims, and those who smoke.
Preparing For & Delivering CPR
With the onset of SCA, it is crucial to begin CPR as swiftly as possible. This initial move towards beginning CPR is best setup with the acronym CCC. CCC stands for Check, Call, Care.
- Check—the surrounding area and for breathing or consciousness
- Unsafe surroundings could include: fire, downed electrical wires, middle of an active roadway, threatening perpetrator, etc
- Check the person for consciousness by trying to rouse them and shouting “are you okay?”
- Check for breathing by looking for chest rise and placing your cheek near their nose and mouth.
- Check for a pulse using two fingers (not the thumb) in an adult on the carotid on the sides of the neck for up to 10 seconds. In a small child or infant check for a pulse in the brachial or inside of the arm.
- Call—911
- Send another person to call 911 while remaining with the victim
- If no one else is able to make the call, initiate some hard and fast compressions before retreating to a phone. Bring the phone to the patient where possible.
- Care—begin CPR
- Move the patient to a hard and flat surface (it offers better support and leverage)
- Kneel beside the victim facing their chest
- Extend one arm placing the heel of the hand in the center of their chest
- The center of the chest can be identified as the end of the breastbone, where the ribs begin, or between the nipples.
- Bring the other hand on top of the first hand interlocking the fingers
- Lean in over the patient
- Keep elbows locked
- Use your body weight to rock back and forth while compressing their chest to a 2 inch depth
- Allow the chest to recoil before compressing again
- Compress quickly to reach a rate of 100-120 per minute
- Consider a tune in your head to the beat of the BeeGees’ “Stayin Alive” or Shakira’s “Hips Don’t Lie” which should help reach the beats per minute goal.
- Compress 30 times
- Prepare for delivering 2 rescue breaths
- Rescue breaths provide breath for the victim who is not breathing on their own. Contrary to common belief, there is oxygen in exhaled breath, which is why rescue breaths are beneficial to those not breathing on their own.
- Open the patient’s airway
- Use the heel of one hand on the patient’s forehead to push downward while using two fingers of the u=other hand under the chin to lift up and back. This is commonly known as the head tilt/chin lift maneuver.
- Seal the nostrils and deliver 2 breaths to the mouth
- Hold for 1 second each.
- Check for proper delivery by watching for the chest to rise.
- Resume compressions for 30 beats
- Repeat the pattern of 30 compressions to 2 breaths.
- Only stop when: medical help arrives, switching out responsibilities with another rescuer, an AED arrives (follow its prompts), or unable to continue.
Hands Only CPR
Hands only CPR is a relatively new development to this life sustaining maneuver. The process sounds just like the name, where hands are taking the only action in CPR. Namely, removal of providing rescue breaths. The theory behind this change is that there is still enough oxygen within the blood within the body to provide what the brain and other organs need to sustain life.
Hands only, or sometimes called compression only CPR is best used in a few circumstances. For those without any CPR experience or training. Those who are long out of training or practice. Or as a means for those who would otherwise opt out of providing CPR all together for fear of the mouth-to-mouth portion.
Hands only CPR is better action than no action. However, traditional CPR with compressions and breaths should never be substituted for those suffering from drowning, other sudden breathing-related onset of SCA, or children and infants.
CPR For The Small
Much of the process of CPR remains the same for all shapes and sizes of patients. There are some differences though when it comes to the littlest of SCA victims.
In infants (less than 1 year of age) the heel of the hand would likely do more damage than good when compressing such a small chest. Instead, use 2-3 fingers in the center of their chest to conduct compressions. The rate of compressions should reach 100 beats per minute. Compression depth is lessened as well to 1 ½ inches.
Rescue breaths follow the same pattern and method as for full sized patients, with some special consideration. Where the nostrils are often closed in larger patients, the nostrils could most likely be covered with the rescuers mouth along with the patient’s mouth. The same force or volume of breath given to an adult or infant would be inappropriate due to the disparity in their lung size. Thus, using less volume and being sure to check for the chest to rise is critical to measure proper rescue breath volume for these small patients.
CPR Tools
Like most things in our modern day, there are advances in the form of helpful tools and products to even CPR practices. Use of any of these enhance the process of providing CPR by making it safer or easier. Use of these tools can even enhance the outcome for the patient.
Personal Protective Equipment
A variety of tools exist under the realm of personal protective equipment or PPE. PPE is some form of equipment or clothing intended to protect the wearer from a hazard. PPE related to CPR comes in a few varieties and is most often creating a safe zone for administering rescue breaths and protecting the rescuer from potential biohazards. CPR masks, CPR pocket masks, CPR face shields all provide a barrier between the patient’s mouth and the rescuer’s mouth. A one-way valve is usually present to allow the rescue breaths to come through, while nothing comes back the other way. These masks are handy to not only protect the rescuer and patient from each other’s germs and fluids, but creates a safe zone for those that would otherwise decline providing rescue breaths for fear of the biohazard.
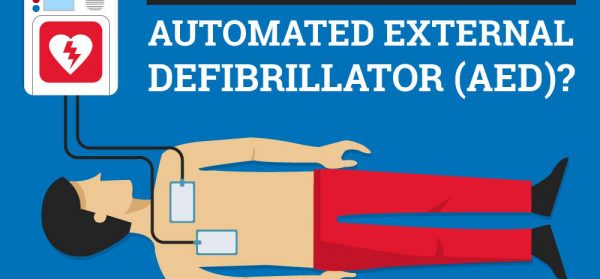
Automated External Defibrillator
A major development to CPR practices when the portable automated external defibrillator (AED) came on scene in the 1960’s. Since the early 1990’s, AEDs have become more widely available and publicly accessible. Even local registries of AED locations with emergency communication departments have been established and continue to grow day by day to inform callers of the location and use of these life-saving electronic devices.
AEDs are an electronic device that can detect the heart’s rhythm and provide a shock if necessary. The use of an AED’s shock is not required in every SCA situation, but it can significantly improve the outcome for those who do. For a convincing comparison, consider that about 9% of victims receiving hands only CPR survive, while 40% of victims who receive CPR with an AED survive. An AED does not replace CPR protocol, but it can enhance its process.
If providing care for someone in SCA, remain with the patient and conduct CPR with the ratio 30:2 compressions and breaths. Send someone to retrieve a close by AED if available. When the AED arrives, continue CPR while the AED is opened, powered on, and prepared by the other rescuer. Remove any clothing blocking access to the chest’s skin. Follow the pictured instructions on the AED pads for proper placement on the patient’s chest.
The AED should have audio and text prompts automatically going. AEDs work by detecting irregular heart rhythms with the sticky pads placed on the top and side of the chest near the heart. It is a common misconception that the AED shocks the heart into starting once more. Rather, the AED sense irregularity in a heartbeat and provides an electric shock to, in a sense, snap the heartbeat back to regularity. If the AED determines a shock is needed, the voice prompts will announce the shock and advise bystanders to stand away from the victim. Move away enough to not touch the patient during this shock. The AED should continue to monitor the heart rhythms and the patient and will provide further prompts that include more shocks, or for the rescuer to continue to conduct CPR. Modern AED models should not shock without warning, so continue to provide CPR when prompted. Once EMS arrives on scene, they may ask the actions taken by the AED and may even take a portion of the AED (pads attached to the patient) with them.
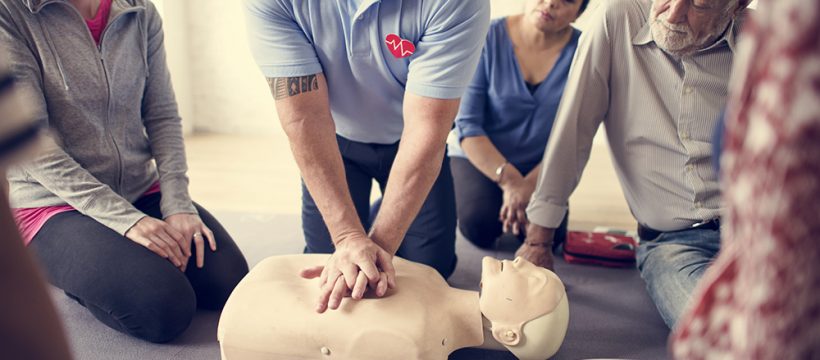
CPR Normalization
The rates of bystander CPR and SCA mortality in a home setting are still troubling. CPR is becoming a standard training requirement at a variety of job sites and even in schools for the students. AEDs are becoming as much of a staple to public places as fire extinguishers. These are amazing efforts toward helping those victims of SCA receive the help they need. As more CPR education is shared, and the tools for the job are more widespread there could be a change in the statistics. Learn CPR, and keep the skill refreshed often. The more people who deliver CPR, the more survivors there will be.
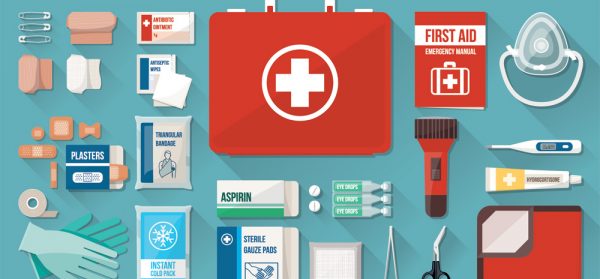
Advanced Guide to First Aid
First aid can take many forms and use a variety of tools and techniques. One fact that remains constant though is no matter the measure of the treatment, it is the first treatment received for illness or injury. Because illness or injury have various degrees of severity, so can the first aid that applies to a specific incident. Proper response can range from putting a bandage on a cut to conducting CPR. With such variety, it is good to be versed in some common needs of first aid.
When Is First Aid Needed?
First aid is needed whenever a person requires some form of medical assistance resulting from illness or injury. It could even apply to oneself.
Most injuries are the result of accidents. Someone gets a paper cut. A kid falls and scrapes their knee. A painter falls off their ladder. A teen playing basketball twists their ankle. The chef burns themselves on a hot surface. A coworker chokes on a bite of lunch in the breakroom. You slip in the shower. A child is stung by a bee. Each of these are accidents resulting in injury and require some medical assistance. Without medical professionals around, first aid needs to kick in.
Let’s not forget about illnesses requiring first aid too. Unless at every cough or sneeze you rush off to the doctor, treatment usually begins at home. From the first troubling signs of illness whether it be fatigue, coughing, congestion, or fever, there are over the counter medications or remedies. An assessment of the symptoms, even with assistance from a medical advice line, and beginning of treatment is what first aid is all about.
First Aid for Injuries
Injuries come in all shapes, sizes, and sources. While there may be variations, there are some basics that will apply to the category of injury. The most common injuries are: cuts and scrapes, burns (including sunburn), bites/stings, bleeding/nosebleed, sprains, tears, fractures. These injuries boil down to three main categories known as wounds, soft tissue injuries or hard tissue injuries.
Wounds
Wound types include cuts, scrapes, burns, bites/stings, splinter, blister and more that break the skin. Wounds can be caused by any manner of injury to the skin or dermis such as puncture, cut, abrasion, overexposure such as to heat or sun, etc. Because wounds can be so various in cause, there are some variations in their treatment. Key first aid functions for wounds are: stop bleeding, clean, and protect.
First stop the bleeding by applying pressure to the area with a clean cloth, gauze, bandage, etc. Next clean the wound. Remove any debris if possible before or during cleaning. Soap and water are usually best for cleaning a wound. Good practice is to lather soap and water allowing it to run down and over the wound followed by rinsing in a similar fashion with clean water. Not scrubbing the wound directly will prevent additional irritation. Apply antibiotic ointment to protect against infection, and cover the area with a sterile bandage.
Burns are treated differently than other damaging effects to the skin. Ice or a cold therapy applied in up to 20-minute increments on and off throughout the day will draw out the heat from underneath the first layers of skin. Specialized burn gel or cream may be applied as well. For sunburns, aloe vera gel is used for similar purposes of relieving the feeling of heat.
Soft Tissue Injuries
Soft tissue injuries include bruises, sprains, strains, stress injuries, tendonitis and bursitis. These injuries are caused by overuse or improper use causing pain and swelling. A few key first aid treatments for these types of injuries are presented with the helpful acronym PRICE. PRICE stands for protection, rest, ice, compression and elevation.
- Protection means to prevent the injury from becoming worse. Try not using the affected area be it the wrist, ankle, let, etc. Examples: use crutches for a sprained ankle, or a sling for a shoulder injury.
- Rest in this circumstance can vary from injury to injury, but it is best to stop and evaluate the range of motion or ability that remains before resuming normal activity level. Some mobility can be good, but until that is known, best to rest from the first aid standpoint.
- Icing the injury site is next which should reduce swelling and pain. Icing a soft tissue injury is best done in increments of up to 20 minutes several times throughout the day. Keep in mind skin is sensitive to cold exposure, so use a barrier such as a paper towel for relief from direct contact with the icy treatment.
- Compression can be accomplished by way of a stretchy bandage wrapping the area and its surroundings. The point of compression will help minimize swelling and provide support. When wrapping the area, be sure to use a bandage with elasticity, move in a figure eight pattern, and use mild tension. Do not constrict the area or cause additional pain.
- Elevation is another component to reduce swelling and is accomplished by elevating the area to a position above the heart. Laying down or reclining may be necessary to achieve the proper elevation of the limb above the heart. Elevation is key in the first day or two of injury.
Hard Tissue Injuries
Hard tissue injuries are almost defined in their category title; think damage to the skeleton. Hard tissue injuries include fractured bones, and even broken teeth. These injuries are often pretty severe, but until medics can help there are some helpful steps to take. First, stop any bleeding there may be. Ideally this is done with a sterile bandage, but any available cloth will work. Ice is helpful once more to reduce swelling and offer some pain relief. Keep the area in the position it is, but immobilize it. A simple splint or brace will provide some temporary immobility.
Choking
Choking is when a foreign body obstructs the airway and a person cannot breathe. Most often this occurs with a piece of food stuck in the esophagus. Choking usually occurs instantly and requires immediate first aid. Calling for help or dialing 911 is not practical for someone choking.
To help a person choking, the object must be dislodged from their airway. The common response is known as the Heimlich maneuver. Approach the choking victim from behind, wrapping arms around them. Make a fist with the thumb wrapped inside and place on the person’s front between the ribs and navel. Wrap your other hand around the fist and pull back toward yourself pressing inward and upward to the victim’s body. Continue this motion. If the person coughs strongly, allow them to cough or resume the maneuver if they are still in distress.
Alternatively, and for small children, a pattern of five thrusts to the abdomen with five thrusts to the back. Continue until the child is responsive, coughs, cries, or the object is dislodged.
First Aid for Illness
Illnesses come in all sorts and manifest themselves often differently. Due to this wide variety, it is good to prepare for some common and basic signs of illness in order to apply first aid as needed.
- Fever
- A fever is when the temperature of the body rises above normal (98.6 degrees F). Fevers are usually determined with a thermometer, but also appear pale, and have periods of hot and cold feelings for the person.
- First aid response for a fever includes: staying hydrated, keeping calm and cool, loosen clothing, offer fever reducing medication. See a doctor if there is difficulty breathing or the fever persists.
- Asthma
- Asthma causes airways to narrow and the lungs to spasm.
- Asthmatics usually help themselves with their inhaler. If an inhaler is not available, advise them to sit and talk to them encouraging them to breathe slowly, call 911. If they become unresponsive before help arrives, open their airway and prepare for potential CPR.
- Allergic reaction
- An allergy is the body’s reaction to something it believes is a threat, such as an infection. Signs of an allergic reaction come on quickly and often include tongue swelling, difficulty breathing, itchiness, puffed/watery eyes.
- Call 911, check if the person has any allergy medication (such as an injection) and administer it to them following its instructions.
- Fainting
- Fainting is a short loss of consciousness caused by a temporary lack of blood flow to the brain. It occurs most often from standing still (or at attention) for a period of time and feeling hot.
- Fainting is often preceded by blackened vision though the eyes are open. The person may express this right before collapse. Lay them down and elevate their legs. Bending slightly at the knees can help too. Give them space and airflow around them. Help them sit back up slowly.
- Diabetes
- Diabetes is an imbalance in a person’s blood sugar levels. There are two types of diabetic reactions either hypoglycemic (not enough sugar) or hyperglycemic (too much sugar).
- Hypoglycemic—victim may appear faint, confused, have a quickened pulse, sweating with clammy skin. Treat by sitting them down and offering them their medication or a sugary item to eat/drink.
- Hyperglycemic—victim may appear warm, have a quickened pulse, is thirty and drowsy. Treat by sitting them down and monitoring their breathing. If they become unresponsive prepare for CPR.
- Diarrhea and vomiting
- Either of these symptoms are caused by irritation within the digestive system. The biggest risk for either is dehydration.
- Offer a cool compress and some reassurance. Allow them to take a comfortable position of their choosing. Offer fluids as long as they can take them, in small sips if necessary. Once the diarrhea or vomiting has subsided, treat the digestive tract with gentle foods following the BRAT diet. BRAT stands for bananas, rice, apples, and toast. This diet should be maintained for 24 hours following the last bout.
References
https://www.ncbi.nlm.nih.gov/pmc/articles/PMC5841784/
https://www.mayoclinic.org/diseases-conditions/sudden-cardiac-arrest/symptoms-causes/syc-20350634
https://www.ncbi.nlm.nih.gov/pmc/articles/PMC5831456/
https://kidshealth.org/en/parents/take-pulse.html
https://www.ehstoday.com/health/cardiac-arrest-survival-rates-higher-aed-use
https://medlineplus.gov/firstaid.html
https://www.hopkinsmedicine.org/health/conditions-and-diseases/softtissue-injuries